Using WiFiChallenge Lab to do recon and list possible attacks with wifi_db Link to heading
A few month ago I wrote an Article called wifi_db: a tool for collecting and analyzing data from wireless networks . In this article I will use it in WiFiChallenge Lab v2.0.
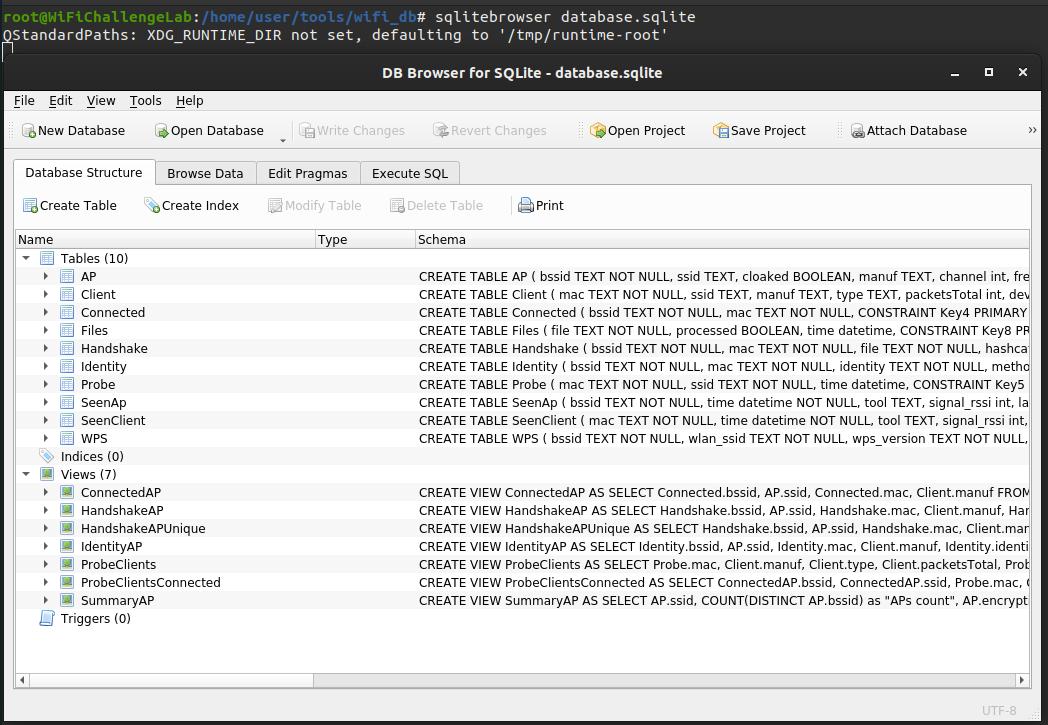
Table Of Contents
Introduction Link to heading
WiFiChallenge Lab is a simulation of a real environment that allows experts to test their skills in a safe and controlled environment, in this article I will use the v2.0 version that will be released soon as an improved version with many changes from the v1.0 version. In the images there is censored information because they are spoilers of the challenges of the laboratory.
wifi_db
is a Python3 program which allows importing files generated with airodump-ng, using the -w flag, and adding them to a SQLite database and extract useful information. To run queries and use the built-in views, the resulting database can be opened with a database client like SQLitebrowser. In this article, we will explore how to use these tools to perform reconnaissance and list possible attacks.
wifi_db Features Link to heading
- Displays if a network is cloaked (hidden) even if you have the ESSID.
- Shows a detailed table of connected clients and their respective APs.
- Identifies client probes connected to APs, providing insight into potential security risks usin Rogue APs.
- Extracts handshakes for use with hashcat, facilitating password cracking.
- Displays identity information from enterprise networks, including the EAP method used for authentication.
- Generates a summary of each AP group by ESSID and encryption, giving an overview of the security status of nearby networks.
- Provides a WPS info table for each AP, detailing information about the Wi-Fi Protected Setup configuration of the network.
- Logs all instances when a client or AP has been seen with the GPS data and timestamp, enabling location-based analysis.
- Upload files with capture folder or file. This option supports the use of wildcards (*) to select multiple files or folders.
- Docker version in Docker Hub to avoid dependencies.
- Obfuscated mode for demonstrations and conferences.
- Possibility to add static GPS data.
- Management Frame Protection (MFP) capable and required column in AP table.
Getting the WiFi data Link to heading
The first step is to monitor WiFi traffic with airodump-ng. In the future it is planned to add Kismet as well, but right now it only works with the airodump-ng captures from the aircrack-ng suite.
Monitoring with airodump-ng Link to heading
Below is the recommended command to monitor all wifi traffic on all channels with airodump using “wlan0”.
airmon-ng start wlan0
airodump-ng wlan0mon --band bag --gpsd --manufacturer --wps -w wifi
--band bagSet airodump-ng to monitor both the 2.4GHz and 5GHz frequency bands.--gpsd: Enables GPSd service for obtaining GPS coordinates.--manufacturer: Displays the manufacturer information of access points.--wps: Enables scanning for Wi-Fi Protected Setup (WPS) vulnerabilities.-w wifi: Specifies the output file name as “WiFi”.
GPS Link to heading
In this case, being a laboratory, I have included a fake GPS in Madrid using gpsfake to imitate a real GPS. In the following image, you can see the file used and the command used to raise a fake gpsd.
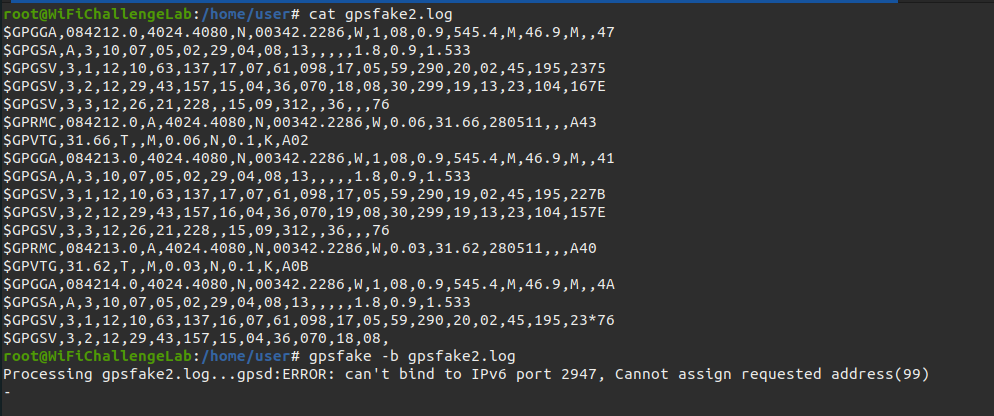
The log file used is as follows. (thanks ChatGPT)
$GPGGA,084212.0,4024.4080,N,00342.2286,W,1,08,0.9,545.4,M,46.9,M,,47
$GPGSA,A,3,10,07,05,02,29,04,08,13,,,,,1.8,0.9,1.533
$GPGSV,3,1,12,10,63,137,17,07,61,098,17,05,59,290,20,02,45,195,2375
$GPGSV,3,2,12,29,43,157,15,04,36,070,18,08,30,299,19,13,23,104,167E
$GPGSV,3,3,12,26,21,228,,15,09,312,,36,,,76
$GPRMC,084212.0,A,4024.4080,N,00342.2286,W,0.06,31.66,280511,,,A43
$GPVTG,31.66,T,,M,0.06,N,0.1,K,A02
$GPGGA,084213.0,4024.4080,N,00342.2286,W,1,08,0.9,545.4,M,46.9,M,,41
$GPGSA,A,3,10,07,05,02,29,04,08,13,,,,,1.8,0.9,1.533
$GPGSV,3,1,12,10,63,137,17,07,61,098,17,05,59,290,19,02,45,195,227B
$GPGSV,3,2,12,29,43,157,16,04,36,070,19,08,30,299,19,13,23,104,157E
$GPGSV,3,3,12,26,21,228,,15,09,312,,36,,,76
$GPRMC,084213.0,A,4024.4080,N,00342.2286,W,0.03,31.62,280511,,,A40
$GPVTG,31.62,T,,M,0.03,N,0.1,K,A0B
$GPGGA,084214.0,4024.4080,N,00342.2286,W,1,08,0.9,545.4,M,46.9,M,,4A
$GPGSA,A,3,10,07,05,02,29,04,08,13,,,,,1.8,0.9,1.533
$GPGSV,3,1,12,10,63,137,16,07,61,098,17,05,59,290,20,02,45,195,23*76
$GPGSV,3,2,12,29,43,157,15,04,36,070,18,08,
With this configuration using gps we can see the latitude and longitude at the top of airodump-ng. Information that we can import later in wifi_db.

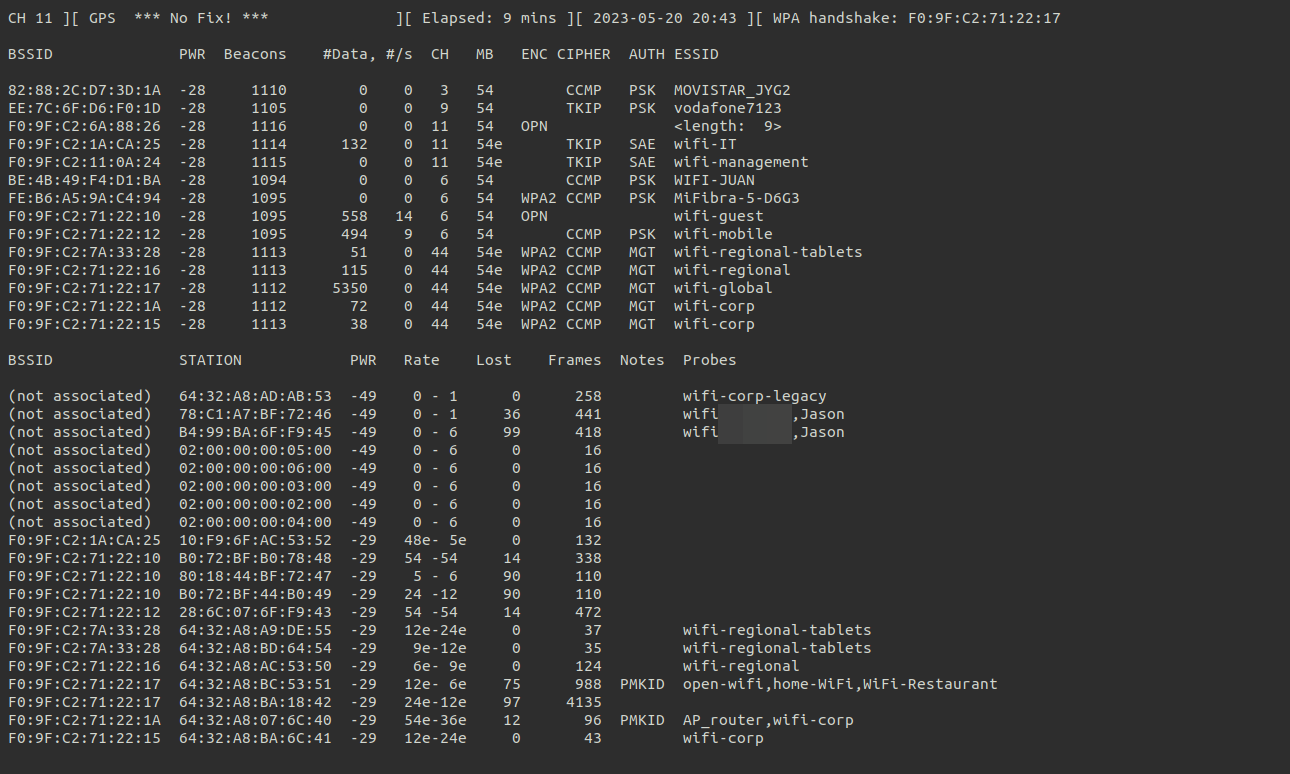
Handshakes Link to heading
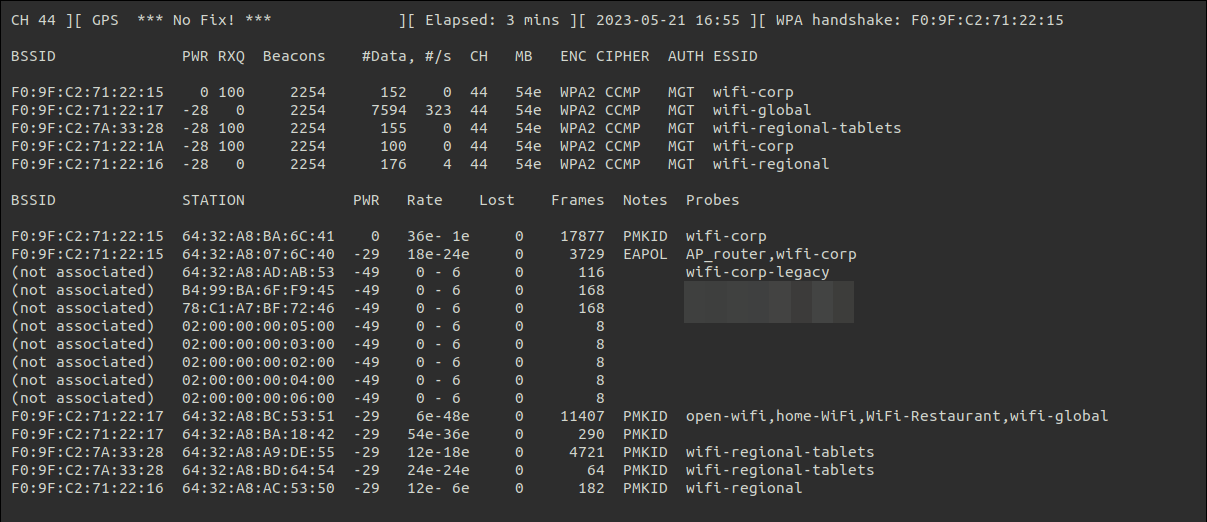
In order to get all the information from the database we will force to get handshakes. By waiting for a user to connect or performing a deauthentication attack we can obtain handshakes as shown in the following image.
Processing the data Link to heading
Once all the information has been obtained, listening on all the channels and then individually on each of the AP channels within the scope, we can import all this data into wifi_db to create the database.
The process of installing the dependencies and using the tool can be found in the README on GitHub . As well as the use of the Docker version.
Import from a file Link to heading
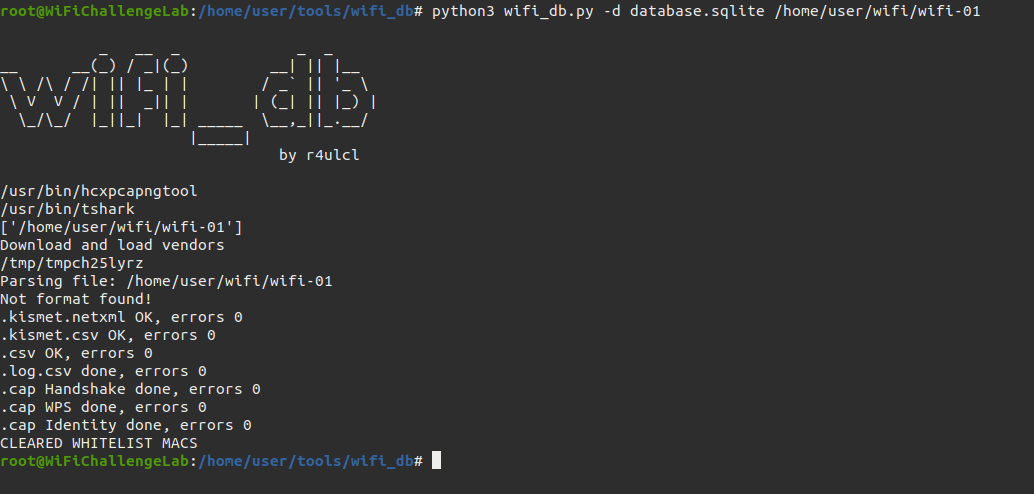
wifi_db
allows the import of a capture with all its formats indicating the file path without the format. It imports .kismet.netxml, .kismet.csv, .csv, .log.csv and .cap files.
python3 wifi_db.py -d database.sqlite /home/user/wifi/wifi-01
-d database.sqlite: save the new database to the file “database.sqlite”/home/user/wifi/wifi-01output of airodump-ng without format (accepts .cap, .csv, kismet.netxml, kismet.csv and .log of none for import every file with that name)
Open the database Link to heading
Once we have the database created we can open the database with sqlitebrowser .
sqlitebrowser database.sqlite
Import a folder Link to heading
In addition to importing a single file or a file with all its formats, it is also possible to import a complete folder.
python3 wifi_db.py -d database.sqlite /home/user/wifi/
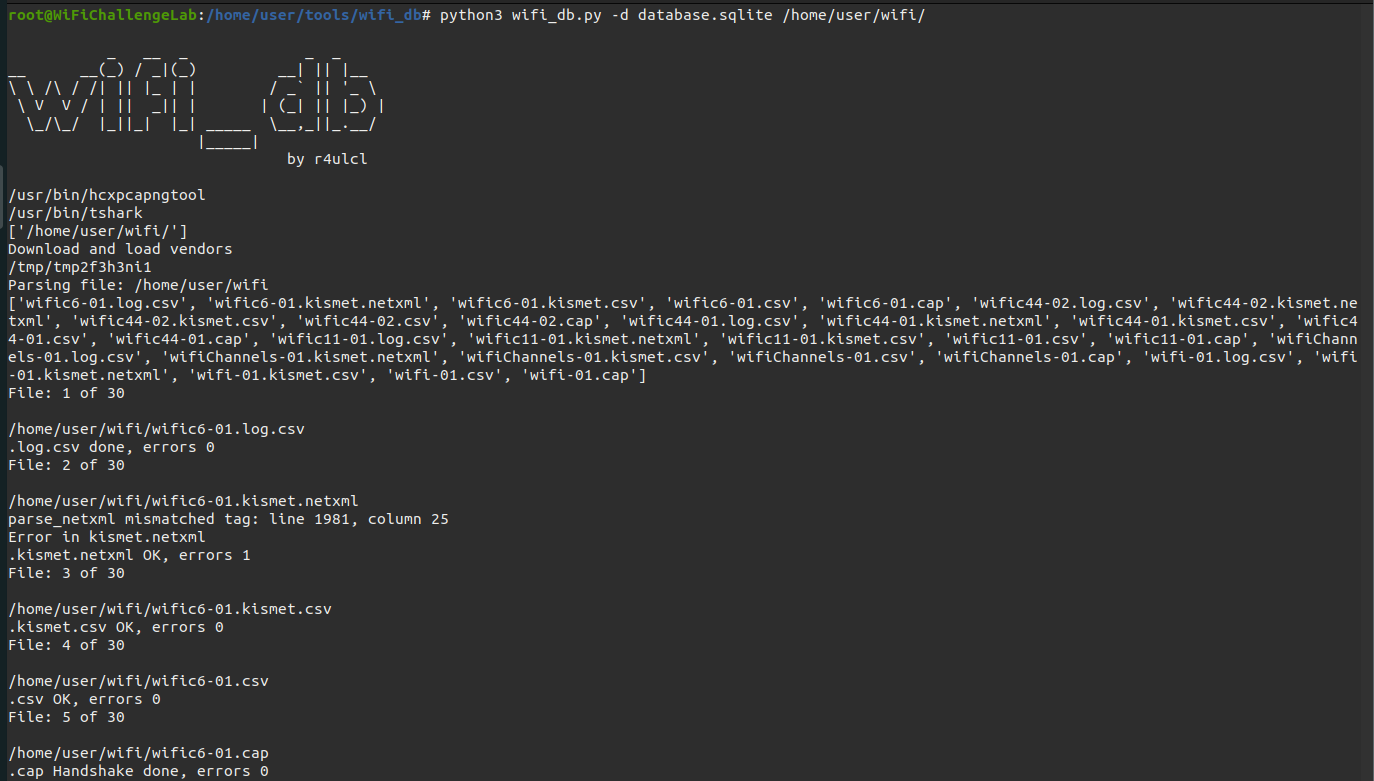
I have also added a table to store the files that have already been added to the database in order to be able to import a folder again regardless of the fact that some of the files have already been added. It’s important to be careful with importing capture files that are not finished yet, as they will not be updated as they will be counted as added files.
Obtaining information Link to heading
Get summary of all APs Link to heading
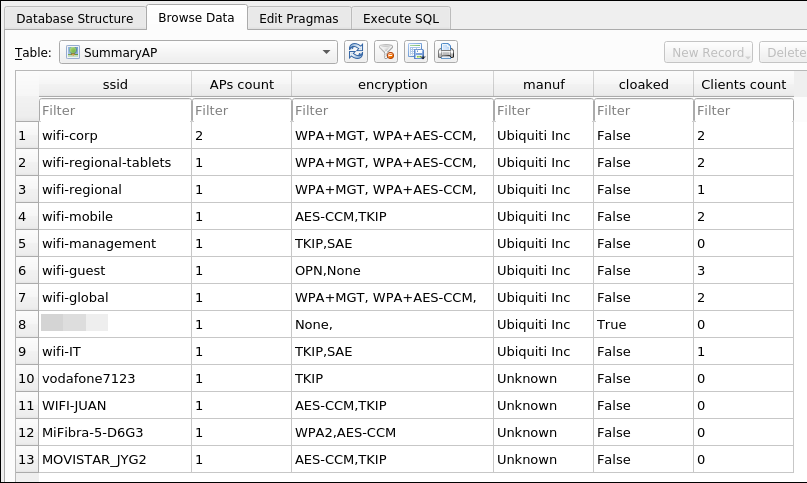
One of the main views is SummaryAP, which shows a summary of all APs with information such as the number of APs organized by ESSID and the number of detected clients connected to these APs.
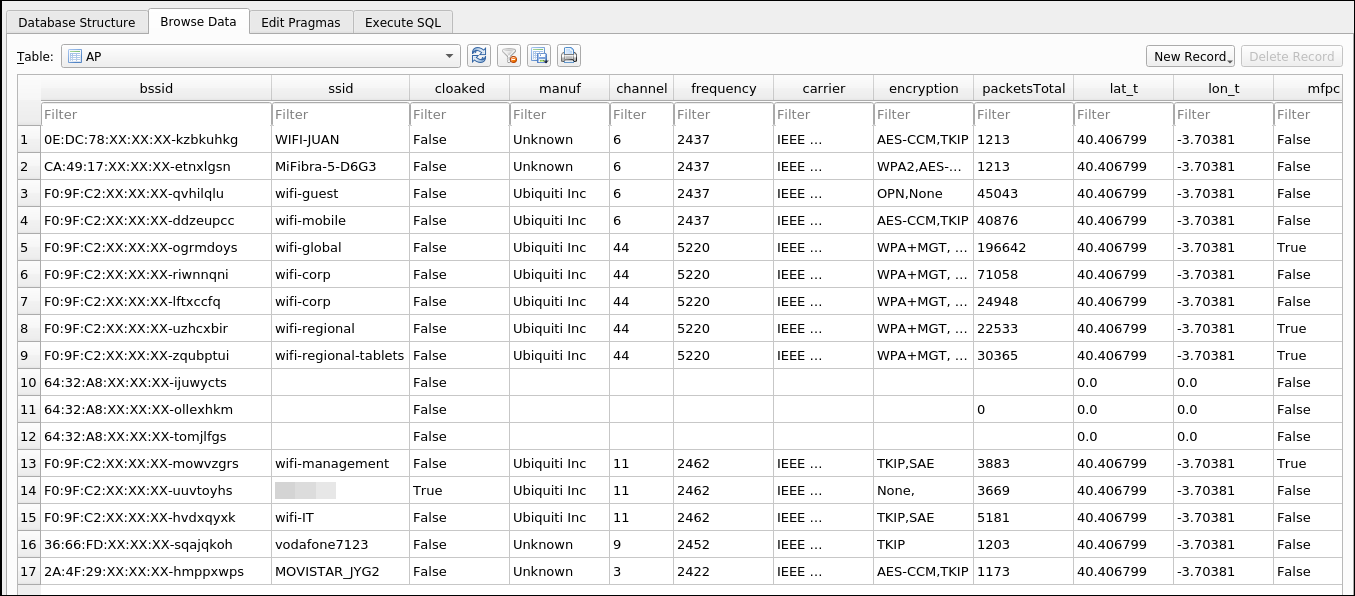
List all APs Link to heading
One of the main tables is the APs table, which shows all the APs detected in the captures with their information, such as ESSID, manufacturer, channel, encryption, etc.
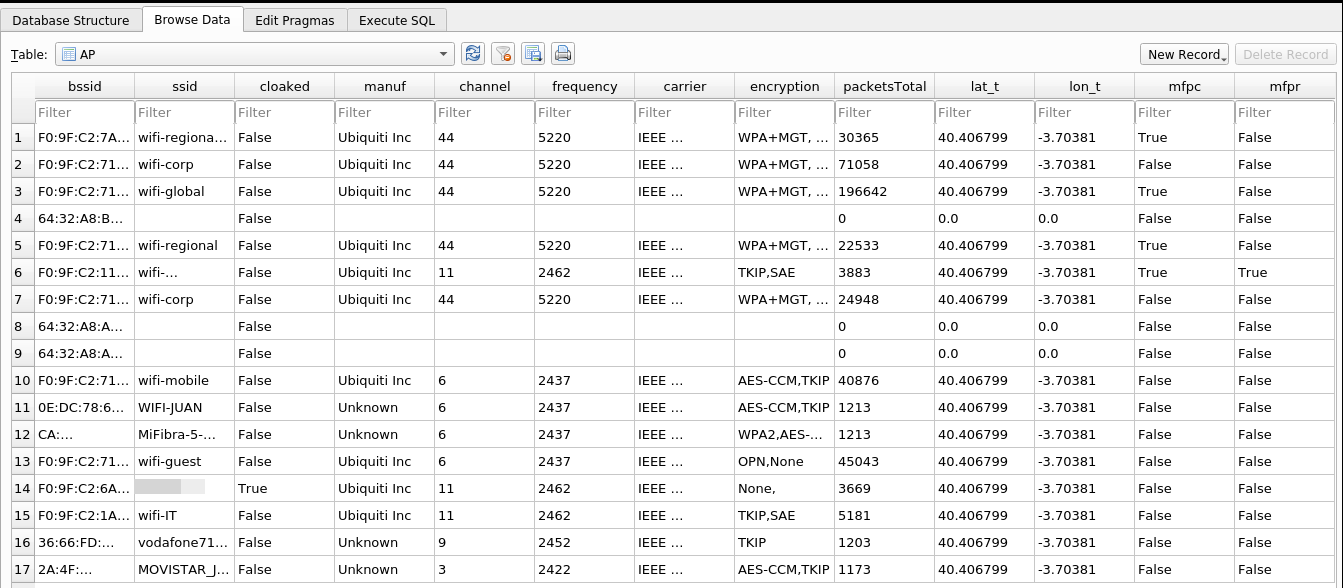
MFP Link to heading
Within the APs table we can see 2 columns referring to Management Frame Protection (MFP). The first one is MFPC (Management Frame Protection Capable) which shows the capability to enable MFP in the APs and the second one is MFPR (Management Frame Protection Required) which obliges the use of MFP in the AP.

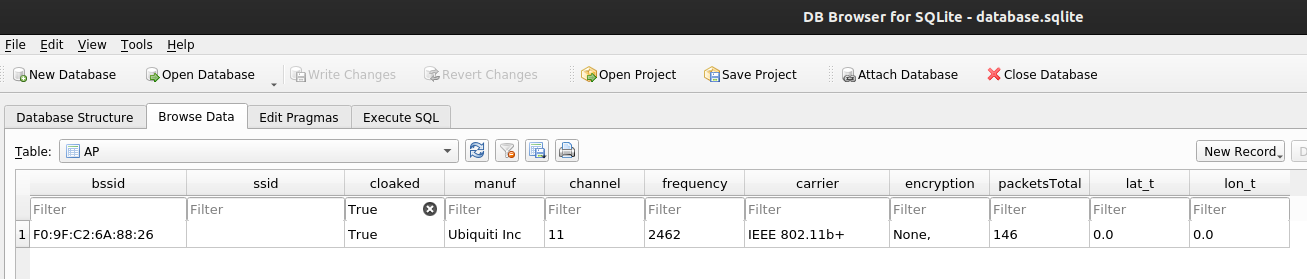
Detecting hidden network ESSID Link to heading
Another important column in the APs is “cloaked” which shows True if the AP uses hidden ESSID. This is useful because many times you have been asked to get the ESSID of a probe so airodump-ng shows it, but it is important to know that the AP is cloaked.
In case that we have the ESSID in the captures the output will be:

List all AP clients Link to heading
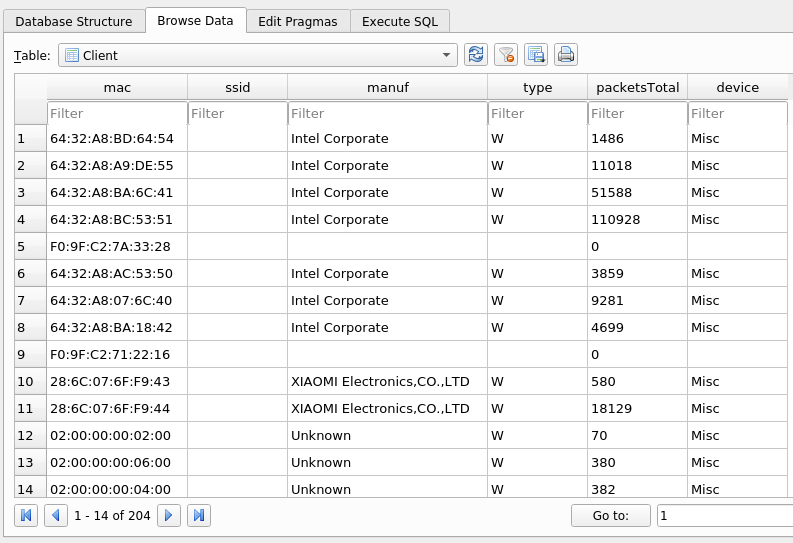
The second base table of the DB is Clients, which shows the complete list of detected clients, as well as the manufacturer of their MAC and the number of packets detected.
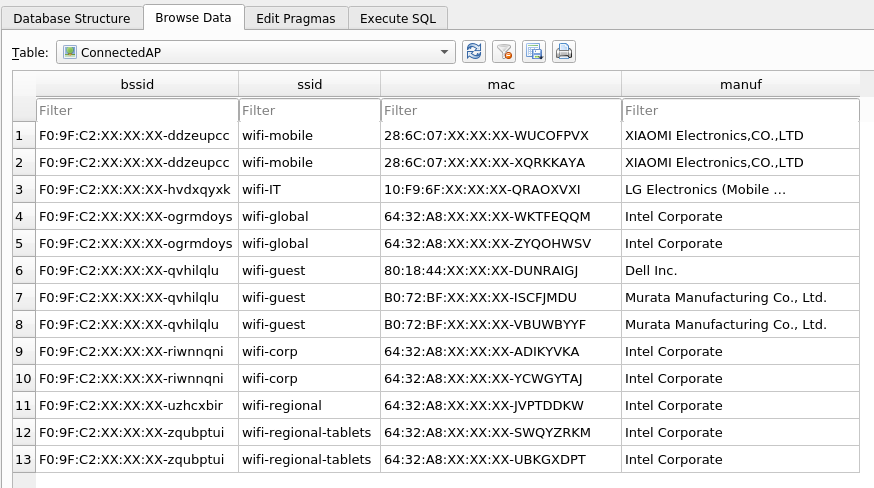
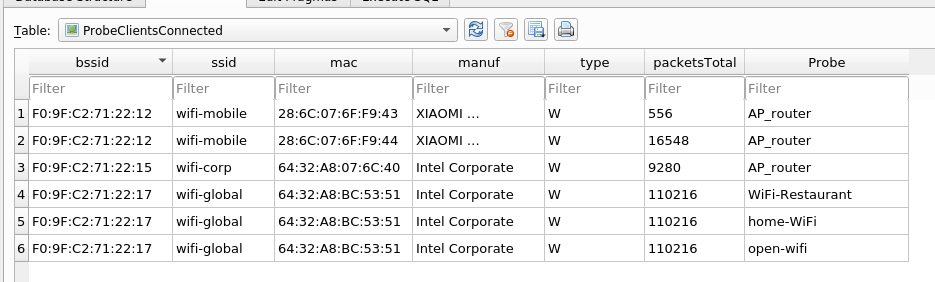
Probes from connected clients in a AP Link to heading
One of the most useful views to plan attacks or to see possible misconfigurations is “ProbeClientsConnected”, which uses the Probes information of the clients and the Clients connected to APs information to show the Probes of clients that have been detected to APs, giving information about probes of clients of the networks we want to attack.
Get handshakes to hashcat Link to heading
wifi_db is also able to export the handshakes directly from the .cap and display them in its own table with the hash ready for hashcat. These hashes can be cracked as follows.
hashcat -a 0 -m 22000 $HASH ~/rockyou.txt
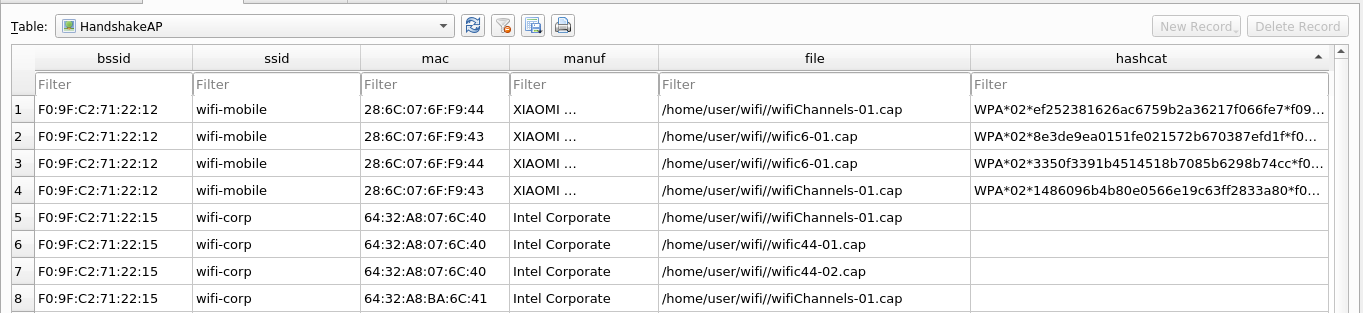
The empty column hashcat is for handshakes of MGT, that can not be cracked
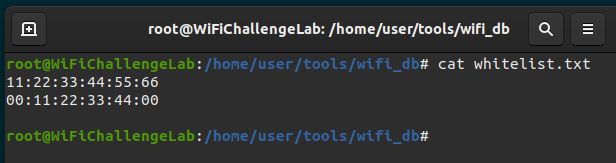
Whitelist MACS Link to heading
An extra functionality that wifi_db has is to use a whitelist of MACs that should not be stored in wifi_db, by default it already includes 2 common MACs in attacks that by default are removed when inserting into the database. This file can be modified and any MAC used by the pentester can be added so that its information is not added to the database.
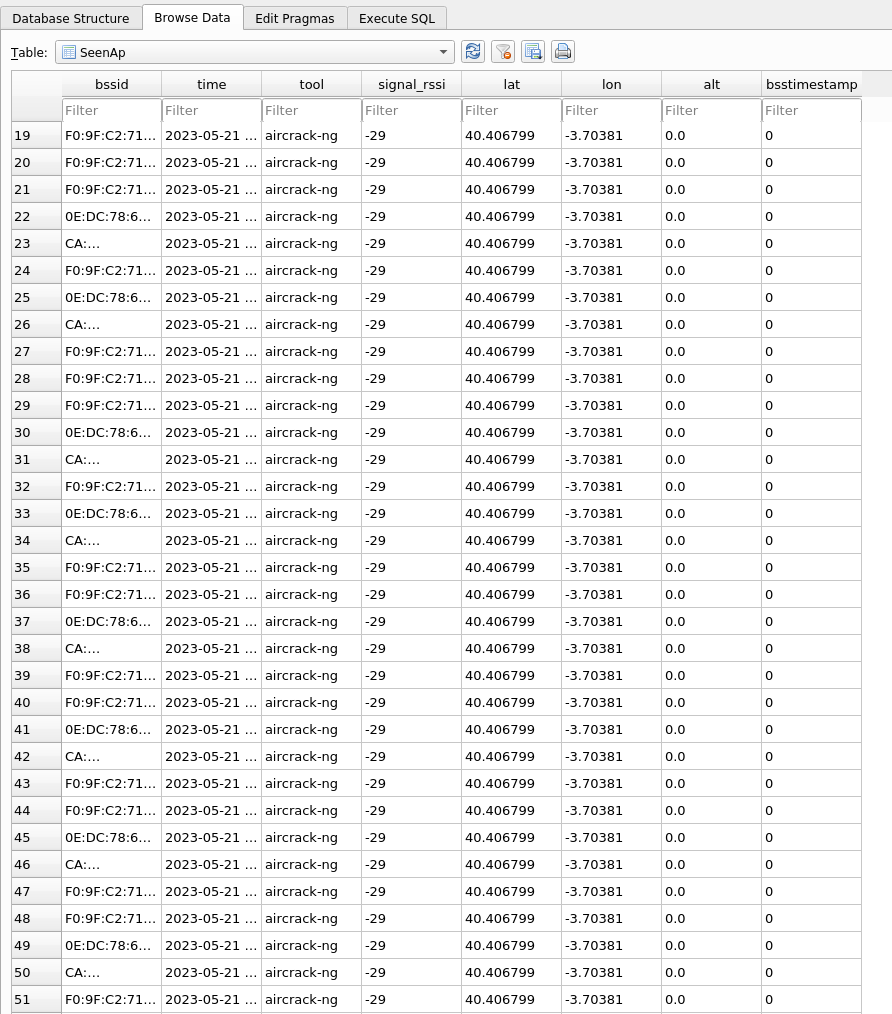
Get a wardriving log Link to heading
Whether GPS is used or not, if the --gpsd option is used in airodump-ng it will create a wardriving log file that allows to obtain a history of the exact date and time at which a client or AP was detected and in the case of GPS also its GPS location.
Obfuscate all info Link to heading
wifi_db has another extra option prepared for proof-of-concepts and talks for which you can anonymize the MACs information of both APs and clients, but keeping the relationship between their information. Below you can see how it is used and how it displays the information.
python3 wifi_db.py -d db-obfuscate.SQLITE /home/user/wifi/ --obfuscated